
IBM is promoting a contest for students of mainframes in Brazil. Basically they have to sign up and perform certain tasks, some simple other complex that can take from weeks to months. The prizes ranging from T-shirts, PSPs and laptops to even working at IBM!
Registration begins for students on August 27 and ends on 05 September 2008, or until all vacancies are filled. The competition, with access to the mainframe,will happen from September 08 until November 28, 2008. It is a good opportunity for students and teachers to know more than the mainframe environment as well as compete for prizes.
SUBSCRIBE US!
![]()
UPDATES

Thursday, August 28, 2008
IBM mainframe Contest for students in Brazil
FaceBook - The Movie

Is Aaron Sorkin getting his geek on?
The famous technophobe and Hollywood scribe is trading the "West Wing" and "Studio 60" corridors for the graffiti-scrawled, software-developer-mobbed corridors of social networking upstart Facebook Inc.
The Palo Alto company says it has not signed on to a Sorkin film about its inception, but Sorkin has started a Facebook group (well, he says, his assistant did that) to gather color for a Facebook film he is writing for Sony and producer Scott Rudin.
A Sony Pictures spokesman confirmed the project but wouldn't discuss details. Through a publicist, Sorkin declined to comment.
Facebook spokeswoman Brandee Barker said: "We are routinely approached by writers and filmmakers interested in telling the Facebook story or the stories of the more than 100 million people who use Facebook to share and make the world more open and connected. At this point, we have not agreed to cooperate with any film project, but we are flattered by the interest."
The Facebook group (where Sorkin groupies have already congregated to write on Sorkin's wall) was first unearthed by the Defamer blog.
Sorkin's Facebook group page reads:
"Welcome. I'm Aaron Sorkin. I understand there are a few other people using Facebook pages under my name -- which I find more flattering than creepy -- but this is me. I don't know how I can prove that but feel free to test me.
"I've just agreed to write a movie for Sony and producer Scott Rudin about how Facebook was invented. I figured a good first step in my preparation would be finding out what Facebook is, so I've started this page. (Actually it was started by my researcher, Ian Reichbach, because my grandmother has more Internet savvy than I do and she's been dead for 33 years.)"
So what will a movie about the messy beginnings of Facebook be called? "A Few Good Founders"? Or "Face Off," complete with tense courtroom scenes from the legal battle over the company's creation?
(Note to Sorkin: Aaron Greenspan -- who attended Harvard with the founders, claims he came up with the idea for Facebook and recently penned a book on the subject -- would like to share his two cents).
And just who will they find to play Mark Zuckerberg, the official Facebook founder and chief executive?
Source: LA Times
Monday, August 25, 2008
Make Partitions in Vista WITHOUT Disk Management
Windows Vista’s Disk Management tool can be quite deceiving. It allows you to work with partitions at ease in a presentable GUI format - but with problems. There have been a lot of complaints and confusion as to why Windows Vista grays out the extend volume and shrink volume properties. In response to this, I have found an alternative way to work with partitions, allowing you to easily resize, delete, and create partitions.
Diskpart.exe does a very good job at working with partitions. Unlike Disk Management, Diskpart actually works!
Before continuing, make sure that you:
- Backed up all important files
- Do not run diskpart.exe with Dynamic Disks
1) First, you’ll want to pull out your Start Menu and type diskpart.exe
This will open a command-prompt like window. At this window, type list disk. This will list all your available hard disks.

2) Proceed by typing select disk < disk number > to select the disk you want to work with.
Creating a Partition or Volume:
At this point in time, you can create a partition. Type create and a set of new options will be presented to you. To proceed, just type create < new option>. (e.g. create volume)
What kind of partition should I create?
Primary: Primary partitions are limited to four per hard disk. If you are planning to install an operating system into a partition, you’ll want to choose primary since it is the only one that can be made bootable.
Extended: If you are planning to have more than four partitions, you’ll want to work with extended. An extended partition counts towards the limit of four, but you are then allowed to create logical volumes within these extended partitions. You’ll want to use extended partitions for backup or storage purposes only since they are not bootable.
3) Now we want to see which number is associated with the volume we want to work with. To obtain this list, type list volume

4) Select the desired volume by typing: select volume < number> or select partition < number>
You then have a list of options to choose from. Below is a list of commands you can type in depending on what you want to do with your selected volume. If you don’t input a number for size, the program will automatically use all the space available for your operation. For the purpose of this tutorial, I have decided to work with 10GB. (1000MB = 1GB)
- Shrink desired=10000 minimum=2000 (Shrinks the volume by 10GB. If that’s not possible, this command makes sure that you at least shrink the volume by 2GB.)
- Extend size=10000
- Delete Partition
- Format
Disk Management can be quite a nuisance since it decides to gray out certain properties on any given day. Please spread the word about diskpart.exe if you know someone who has had trouble working with partitions; as I am sure there are lots who are having similar problems. Read More......
Friday, August 22, 2008
Free Virtual Desktops from Microsoft

Multitasking re-defined
Read email on one, browse the web on the second, and do work in your productivity software on the third, without the clutter of the windows you’re not using. After you configure hotkeys for switching desktops, you can create and switch desktops either by clicking on the tray icon to open a desktop preview and switching window, or by using the hotkeys.

The program is just 62kb in size and can be downloaded (or run as you wish) for free from the Microsoft website HERE.(It runs on even Vista!) Read More......
CANON 50D SPECIFICATIONS [LEAKED]

I’ve set forth the relevant translated specs and info below. Please note that the original specs listed here listed in-body IS as a feature. The translation was wrong and the feature has been removed from the spec list below. The specs referenced the advantages and compatibility with lens-based IS instead.
Here are the prominent features;
15.1 megapixel CMOS sensor
DIGIC 4
1.6x crop
Dust Reduction
Auto Brightness Processing
95% viewfinder .97 magnification
9 point af (All Cross Type)
35 meter area equipped with high-precision sensors
AF Fine Tuning
ISO 100-12800
6.3 fps (high speed) 3fps (low speed)
Buffer: 16 RAW - 60 JPG - 10 RAW+JPG
920,000 points VGA 3.0-inch LCD monitor
100,000 cycle shutter
Rugged magnesium alloy bodyFull Specifications
Canon 50D Full Specifications
General
Camera Type: Has a built-in flash AF / automatic exposure single-lens reflex digital cameras
Media Type: I or Type II CF card, UDMA compatible
Image Sensor Size: 22.3×14.9 mm
Compatible Lenses: Canon EF-series (including EF-S series lenses) (35 mm converted the focal length of the lens focal length is about 1.6 times)
Lens mount: Canon EF mount
Image Sensor
Type: CMOS Image Sensor
Effective Pixels: Approx.15.1 million pixels
Aspect ratio: 3:2
Dust removal function: Auto, Manual, add the dust data
Recording System
Recording format: Camera File System Design Rule 2.0
(Design rule for Camera File System 2.0) (Design rule for Camera File System 2.0)
Image types: JPEG, RAW (14 place Canon original); RAW + JPEG
Records of pixels: (4752 x 3168) Large: about 15.1 million pixels (4752 x 3168)
Medium: about 8 million pixels (3456 x 2304)
Small: about 3.7 million pixels (2352 x 1568)
RAW: about 15.1 million pixels (4752 x 3168)
sRAW1: about 7.1 million pixels (3267 x 2178)
sRAW2: about 3.8 million pixels (2376 x 1584)
Create / select: Folder Yes
Image Processing
Photo style: Standard, portrait, landscape, neutral, reliable setup, monochrome, User-defined 1-3
White Balance: Auto, the default (Daylight, Shade, Cloudy, Tungsten Lamp, White fluorescent light, flash), user-defined, Color temperature settings (2500-10000 K)
Noise Reduction: Can be applied to long time exposure and high ISO sensitivity shooting
Automatic image brightness correction: Automatic brightness optimization
High-priority tone: Yes
The amount of light surrounding the lens correction: Yes
Viewfinder
Type: Eye-level pentaprism
Rate outlook: Vertical / horizontal direction about 95 percent
Magnification: About 0.95 times (-1 m-1, using 50 mm lens on the infinite distance AF)
Focus: About 22 mm (eyepiece lens from the central -1 m-1)
Built-in diopter adjustment: -3.0 - +1.0 M-1 (dpt)
Focusing Screen: Ef-A equipped with the standard screen, and can replace the screen (2 sold separately)
Mirrors: Express back -
Depth of Field Preview: Yes
AF
Type: TTL auxiliary video coincidence, the phase detection
Automatic focus points: 9 (all cross-)
Metering range: EV -0.5 - 18 (23 ° C/73 ° F, ISO 100)
Focus modes: Single AF, AI Servo AF, Artificial Intelligence AF, manual focus (MF)
AF-assist light: By the built-in flash for a short flash
AF fine-tuning: AF can be fine-tuning
Exposure Control
Metering Mode: 35 Zone TTL full-aperture metering
Evaluation meter (with the focus of any automatic linkage)
Partial metering (the viewfinder about 9 percent of the area)
Spot (viewfinder central area of about 3.8%)
Central focus of the average metering
Metering range: EV 1-20 (23 ° C/73 ° F, the use of EF50mm f/1.4 USM lens, ISO 100)
Exposure Control: Programmed auto exposure (automatic, portrait, landscape, Macro, Sports, Night Portrait, Flash off, creativity automatic, procedures), shutter priority automatic exposure, aperture priority auto exposure, depth of field priority auto exposure, manual exposure
ISO Sensitivity: (Recommended exposure index)
Basic shooting zone mode: automatically set between ISO 100-1600
District creative shooting modes: ISO 100 - 3200 (in 1 / 3 increments), Auto, ISO sensitivity can be extended up to ISO 6400 or ISO 12800
Exposure compensation: Manual and automatic exposure bracketing (with manual exposure compensation can be used in combination) - Can be set numerical: ± 2 Stage 1 / 3 or 1 / 2 units to adjust
Auto exposure lock Auto: evaluation of the use of metering single AF mode - Manual: auto exposure lock button
Shutter
Type: Electronically controlled focal plane shutter
Shutter speed: 1 / 8000 second to 1 / 60 seconds (automatic mode), flash synchronization speed of 1 / 250 second 1 / 8000 to 30 seconds, B Mun (the shutter speed range. With the availability of various shooting modes. )
Flash
Built-in flash: Recoverable, auto-flash
Flash: 13/43 (ISO 100, to m / ft unit) flash coverage: 17 mm camera angle. Recycle time of about three seconds
External flash: X series of flash (camera can set up some flash function)
Flash Metering: E-TTL II automatic flash
Flash Exposure Compensation: ± 2 Stage 1 / 3 or 1 / 2 units to adjust
Flash Exposure lock: Yes
PC terminal: Yes
Driving System
Types: Single-shoot, high-speed shot, low shot funny (10 seconds or two seconds delay)
Continuous speed High-speed: Approx. 6.3 / sec. max
Low: the most about 3 / sec.
Continuous maximum number of (High-Speed Continuous):
JPEG large / distinctions: about 60 (90)
RAW: about 16 (16)
RAW + JPEG large / distinctions: about 10 (10)
* Based on these values to use 2 GB of memory cards, Canon testing standards (ISO 100 photos and standard style).
*Value in brackets apply to the testing standards based on Canon’s Ultra DMA (UDMA) 2GB memory card.
Live View Shooting
Focus: Fast mode (testing phase)
Real-time mode, real-time facial priority mode (contrast detection)
Manual focus (can be enlarged five times / 10 times)
Metering Mode: The use of image sensors to evaluate Spot
Metering range: EV 0 - 20 (23 ° C/73 ° F, the use of EF50mm f/1.4 USM lens, ISO 100)
Mute shooting: Yes
LCD Monitor
Type: TFT color liquid crystal display (there are seven brightness adjustment)
Monitor size and resolution: 3 inches, about 920,000 points (VGA)
Coverage: About 100%
Language: Interface 25 (with English)
Image playback
Image display format: Leaflets, pamphlets + information (image quality records, the shooting information, the histogram), four images index, nine image index, rotating images
Zoom: About 1.5 times - 10 times
View images method: Leaflets images, 10 or 100 images, screen, the date, Folder as a unit Jump
High-warning: Excessive exposure of the regional high-flicker
Direct Print
Compatible printer: PictBridge-compatible printers
Print Image: JPEG and RAW image
Print command: DPOF1.1 compatible version
Custom
25 Custom Functions
Camera user settings In the mode dial position of the C1 and C2 registered
Registration menu: Yes
Interface
Digital Video: For computer communications and direct printing (Hi-Speed USB)
Video output terminal: 3.5 mm mini-jack (optional NTSC / PAL)
HDMI mini OUT: terminal C -
Remote Terminal: And N3-compatible line of the shutter
Docking Systems terminal: WFT-E3 Used to connect wireless file transfer for WFT-E3
Power
Battery: Battery BP-511A (1)
* AC adapter can be packaged using the AC ACK-E2
* Installation of the battery box and handle BG-E2N or BG-E2, you can use on the 5th (AA/LR6) battery
Battery capacity shooting (Based on CIPA testing standards): 50 percent of the normal use of flash photography: 23 ° C/73 ° F at about 640. 0 ° C/32 ° F at about 540. 50% of the use of flash photography of real-time display: 23 ° C/73 ° F at about 170. 0 ° C/32 ° F at about 130.
Size and weight
Size (Width x x high-thick): 145.5×107.8×73.5 mm / 5.7 x4.2×2.9 inches
Weight: About 730 grams / 25.7 ounces (body only)
Operating Environment
Temperature range: 0 ° C-40 ° C/32 ° F-104 ° F
Working humidity range: 85 percent or less
Battery BP-511A
Type: Rechargeable lithium batteries
Rated voltage: 7.4 V DC
Battery capacity: 1390 mA
Size (Width x x high-thick): 38×21x55 mm / 1.5 x0.8×2.2 inches
Weight: About 82 grams / 2.9 ounces
Battery Charger: CB-5L
With battery BP-511A, BP-514, BP-511 or BP-512
The length of the power cord: About 1.8 m / 5.9 ft.
Charging time: About 100 minutes
Input Voltage: 100-240 V AC
Output voltage: 8.4 V DC
Temperature range: 0 ° C-40 ° C/32 ° F-104 ° F
Working humidity range: 85 percent or less
Size (Width x x high-thick): 91×67x32.3 mm / 3.6 x2.6×1.3 inches
Weight About 105 grams / 3.7 ounces (not including the power cord)
This information was translated from Chinese.So inadverent errors might have crept in.Sorry for the errors, if any.
SOURCE: PHOTOGRAPHYBAY
Read More......
Thursday, August 21, 2008
Mac Bundle Box - Special Offer

The available applications are;
1)Headline - a reader of feeds with minimal extreme aspect.
2)Mac Pilot 3 - system optimizer
3)iConquer - a strategy game.
4)Mahjong Forests - a Chinese traditional game.
5)Shoebox Express - an organiser of photograph according to subjects.
6)Caboodle - Lean, clean, snippet machine to store information on your Mac
7)Narrator - reader of text in multiple voices.
8)WriteRoom - a text publisher that promises concentration only in the text.
9)Scribbles - a simple tool of drawing.
10)Money - Form to organise the domestic finances.
11)Operation - Publisher of projects.
12)Dawn - a alarm-clock that itself co-ordinates with iTunes.
13)Composer - an image publisher.
14)Sofa Control - to control many applications through apple remote.
Read More......
Yes-its an iPhone with a Telescope

Have your ever wondered if you could use your multi-utility iPhone even as a telescope?If not, then we'll tell you - "YOU CAN".
One of the most critical feature of the iPhone is its 2 mega pixel camera.You might have wished that Apple could have done a lot better in the camera.But wait, did you know that you can.This add-on telescope for the Apple iPhone won’t make your mobile phone look very good, but it will give you 6x zoom capabilities.
Usage
- Change the cellphone back shell first enclosed with the telescope.
- Adjust the clear foucs with the naked eye.
- It can take a picture while fixing the telescope on back shell. (If the screen of your cellphone is analyzed degree enough, you can adjust the focus with the screen of the cellphone).
Read More......
Microsoft Photosynth - A 3D Experience

First there was the snapshot, and then came video. Now there is Photosynth,
On Wednesday night, Photosynth, a technology demo from Microsoft Live Labs, is graduating from its "ooh, that's pretty" status to being a viable Web service for consumers.

The technology, which takes a grouping of photographs and stitches them into a faux 3D environment, can now be implemented with photos you've taken on your digital camera or mobile phone, and converted right on your computer. Previously, the process of stitching these photos together took weeks of processing on specially configured server arrays. With its latest version, Microsoft has managed to shrink that into around the time it takes to upload your photos.
Microsoft is giving users 20GB of online storage for their Photosynth collections. Photosynth product manager Joshua Edwards tells me this can easily fit 60 or more "synths" made up of around 150 to 200 photographs apiece--the higher end of what's recommended for what Edwards calls an optimum or "synthy" experience. Users who are making really neat collections will be granted additional space.
One of the most impressive parts of Photosynth is how damn fast it is. Over a decent broadband connection you'll immediately see large thumbnails that quickly begin to sharpen as data fills in the missing pixels. You can continue to zoom into these areas and they'll sharpen up even more on some of the super high-resolution shots.

The streaming and rendering technology behind Photosynth is Seadragon, another project from the Microsoft Live Labs universe. Users have always had to download a special Seadragon-based plug-in to view other people's synths. The new twist with the latest plug-in now comes with a desktop uploader that can be used to add your own collection to the Photosynth universe. This runs with complete autonomy from your browser, so you don't have to worry about it stopping if you close out your browser. It also works in both IE 7 and Firefox 3, making it cross-platform--at least for Microsoft. If you're a Mac user looking to get your hands on some Photosynth action you'll have to keep waiting. The focus on Photosynth will remain on the PC for the time being.
So,this could be "Sweet" or "Sour" depending on the Operating System you use, because this works only on WINDOWS!
Read More......
On Wednesday night, Photosynth, a technology demo from Microsoft Live Labs, is graduating from its "ooh, that's pretty" status to being a viable Web service for consumers.

The technology, which takes a grouping of photographs and stitches them into a faux 3D environment, can now be implemented with photos you've taken on your digital camera or mobile phone, and converted right on your computer. Previously, the process of stitching these photos together took weeks of processing on specially configured server arrays. With its latest version, Microsoft has managed to shrink that into around the time it takes to upload your photos.
Microsoft is giving users 20GB of online storage for their Photosynth collections. Photosynth product manager Joshua Edwards tells me this can easily fit 60 or more "synths" made up of around 150 to 200 photographs apiece--the higher end of what's recommended for what Edwards calls an optimum or "synthy" experience. Users who are making really neat collections will be granted additional space.
One of the most impressive parts of Photosynth is how damn fast it is. Over a decent broadband connection you'll immediately see large thumbnails that quickly begin to sharpen as data fills in the missing pixels. You can continue to zoom into these areas and they'll sharpen up even more on some of the super high-resolution shots.

The streaming and rendering technology behind Photosynth is Seadragon, another project from the Microsoft Live Labs universe. Users have always had to download a special Seadragon-based plug-in to view other people's synths. The new twist with the latest plug-in now comes with a desktop uploader that can be used to add your own collection to the Photosynth universe. This runs with complete autonomy from your browser, so you don't have to worry about it stopping if you close out your browser. It also works in both IE 7 and Firefox 3, making it cross-platform--at least for Microsoft. If you're a Mac user looking to get your hands on some Photosynth action you'll have to keep waiting. The focus on Photosynth will remain on the PC for the time being.
So,this could be "Sweet" or "Sour" depending on the Operating System you use, because this works only on WINDOWS!
Wednesday, August 20, 2008
Intel's new Dual-core Atom chip

Intel at its Developer Forum is quietly providing new details of its widely reported dual-core Atom processor. Although not providing all formal details itself, the company is expected to launch an Atom 330 with twin cores at 1.6GHz and will be built on a 45 nanometer process that reduces the amount of power use despite the additional core. The chip should remain on the same 533MHz system bus.
Other details of the processor itself are still unknown, though past leaks have pointed to a continued use of Hyperthreading that would let each core handle as many as two code threads at one time and create up to four effective cores with optimized apps. A doubled Level 2 cache of 1MB should also help improve performance.
The semiconductor firm has already confirmed that its initial implementation will include at least a desktop version for nettops and other very low-power, budget systems. A new mainboard, the D945GCLF2, will fit into any mini-ITX case and will include both GMA 950 integrated graphics as well as support for up to 2GB of memory in a single slot, gigabit Ethernet, as well as equal pairs of Parallel and Serial ATA connections for storage.
A launchpad for the new mainboard is sheduled for September.
SOURCE: Electronista
Read More......
The semiconductor firm has already confirmed that its initial implementation will include at least a desktop version for nettops and other very low-power, budget systems. A new mainboard, the D945GCLF2, will fit into any mini-ITX case and will include both GMA 950 integrated graphics as well as support for up to 2GB of memory in a single slot, gigabit Ethernet, as well as equal pairs of Parallel and Serial ATA connections for storage.
A launchpad for the new mainboard is sheduled for September.
SOURCE: Electronista
Steve Jobs acknowledges iPhone app crash

iPhone owners suddenly locked out of their third-party apps by a crash bug on startup will have a solution only in September, Apple chief Steve Jobs has revealed.
Steve job has published a characteristically brief and rare personal responses, assuring the iPhone users that his company is aware of the problem and has a solution.
"This is a known iPhone bug that is being fixed in the next software update in September," reads the one-line message from the Apple co-founder.
Many report the iPhone 2.0 firmware suddenly failing to load non-default apps regardless of their nature, briefly loading them before abruptly jumping back to the home screen.
The bug occurs both with freshly downloaded software and with updates, but is reported as never having a definite fix; although some report successfully deleting and re-downloading apps to regain access, others find the solution either having no effect or gradually decaying over time to where the apps again fail to run. Restoring the iPhone also seldom works.
Even if the root cause has been identified, however, the weeks-long wait has been cold comfort for those affected by the crashes, many of whom had updated their original iPhones just to add support for third-party programs.
So, lets just wait and watch the iPhone.I do think that its following the same path as that of Vista (great hype before launch and no need to explain thereafter!)
Read More......
Steve job has published a characteristically brief and rare personal responses, assuring the iPhone users that his company is aware of the problem and has a solution.
"This is a known iPhone bug that is being fixed in the next software update in September," reads the one-line message from the Apple co-founder.
Many report the iPhone 2.0 firmware suddenly failing to load non-default apps regardless of their nature, briefly loading them before abruptly jumping back to the home screen.
The bug occurs both with freshly downloaded software and with updates, but is reported as never having a definite fix; although some report successfully deleting and re-downloading apps to regain access, others find the solution either having no effect or gradually decaying over time to where the apps again fail to run. Restoring the iPhone also seldom works.
Even if the root cause has been identified, however, the weeks-long wait has been cold comfort for those affected by the crashes, many of whom had updated their original iPhones just to add support for third-party programs.
So, lets just wait and watch the iPhone.I do think that its following the same path as that of Vista (great hype before launch and no need to explain thereafter!)
Saturday, August 16, 2008
Vista and Mac Leopard-Dual Boot
Well before we proceed with the guide, here is the stuff that you will need for a successful dual boot setup. Well now that you have everything ready, lets get started then. Please note this is going to take sometime so I suggest you have some Music playing near by and grab yourself a cup of coffee while you do this. Sit tight, here we go………. Please don’t select any patches etc during the installation, this is normally the reason for most failed installations. Just the plain install would do. fdisk -e /dev/rdisk0 Note: If you are unable to log into windows, because there is an error which says “winload.exe” correupted.! Relax. Just insert the Windows VISTA boot DVD into the drive and restart. Click on “Repair computer” once you are inside the DVD and it will automatically detect if a problem exists and suggest “Repair and Restart”. Press the same, and remove the DVD once the PC is about to restart. You should now be able to log in to vista without any problem. bcdedit /copy {current} /d “Mac OS X” In the first command type {current} as it is, literally..nothing else..just {current} with the brackets. In the 3rd command however, replace the {GUID} with the alphanumeric GUID you see in the enumerated list under MAC OS X. You can see this list on your terminal as soon as you type the 2nd command above. Again select MAC OS X, and now as the timer counts down, Press F8. You would see a list of partitions on your disk with their names. Select the partition with MAC OSX installed by using up/down arrows and press ENTER. See it was that simple. No more HFS+ and Blinking Cursor errors. Just follow this guide step by step and you should be able to dual boot Windows Vista and Leopard in no time. If you have any questions just drop in a comment, I’ll reply at the earliest. For Drivers and Patches I suggest you look at the InsanelyMac Forums. This guide would have been nearly impossible without : If you are looking to Install Leopard on an AMD based machine follow the instructions here to patch your iATKOS v1.0 Image. Special Thanks to I Am Nihilist
OK.So you do admit that Vista is not what you need with all the negative comments and the security issues around it and within inside you feel that you want a MAC.But you have just spent a couple of grand on your new (or a year or so old) PC.So, what are you going to do now? Well, in this tutorial I show you how to DUAL BOOT Mac OS Leopard on your Vista installed Intel (and also AMD) computer.Follow the instructions very carefully and feel free to post any doubts or suggestions you need.
DISCLAIMER:
flag 1
quit
reboot
bcdedit /enum active
bcdedit /set {GUID} PATH \chain0
Thursday, August 14, 2008
Dell releases 19 hours Laptop
Recently, Dell launched a new laptop, the Dell Latitude E6400 which has a whopping battery capacity of 19 hours. This Latitude laptop is equipped with two batteries which along with the latest technology and software provides 19 hours of battery life
The company's Latitude E6400 runs for as much as 10 hours on a single nine-cell battery, and an additional battery that snaps on to the bottom of the laptop adds as much as nine hours of battery life, Dell officials said at a press event in San Francisco. That gives users close to a full day of laptop use without carrying an AC adapter to recharge the batteries.
The Latitude E6400 comes with a 14.1-inch screen and runs an Intel Core 2 Duo processor. It can have as much as 8G bytes of RAM and 250G bytes of storage. The system comes preloaded with Windows Vista, with an option to downgrade to Windows XP. It is priced starting at US$1,139. The Latitude E6500, a similar laptop with a larger screen, was also announced, starting at $1,169. Both systems are available immediately.
Windows apps on Linux the CrossOver way

Who says you have to give up your must-have Windows applications when you migrate to Linux? If you can't leave some crucial Windows program behind, you can run it using CodeWeavers' latest version of CrossOver Linux.
Though today there are many great Linux end-user applications, some people still have "must-have" Windows applications -- Quicken instead of GnuCash, for instance, or Photoshop instead of the GIMP. That's where CrossOver Linux 7 comes in.
With this new version, you can run more Windows programs on Linux than ever. Such popular Windows programs as Microsoft Office -- from 97 to 2007 -- Internet Explorer 6, and Quicken run almost as well on Linux as they do on Windows. Other programs, like Adobe Photoshop CS3, run decently albeit not perfectly on Linux with CrossOver.
CrossOver is based on the open source project Wine, an implementation of the Windows API on top of the Unix/Linux operating system family. Wine is a very mature project, which, after 15 years of development, has reached the 1.0 mark.
You don't need CrossOver Linux to run Windows applications on Linux. Wine alone is enough. Wine, however, requires more technical expertise to use properly. What CrossOver gives you is an automated Windows application installation and technical support. For most users, who just want to run their Windows programs and not bother with the nuts and bolts of Wine, CrossOver Linux, which retails for $40, is worth the money. CodeWeavers also offers CrossOver Mac, which brings the same functionality to Intel-powered Macs.
To see how well this Wine 1.0-powered edition of CrossOver Linux works I tested it on two systems. The first was my main openSUSE 11 desktop, a Hewlett-Packard Pavilion A6040N Desktop PC powered by a 1.86GHz Intel Core 2 Duo E6320 dual-core processor with 2GB of 533MHz RAM and a 320GB SATA (Serial ATA) hard drive running at 7200 RPM. It's a good 2007-era PC.
I also put CrossOver 7 through its paces on an older Gateway 503GR running Ubuntu 8.04. It comes with a 3GHz Pentium 4 CPU, 2GB of RAM, an ATI Radeon 250 graphics card, and a 300GB SATA drive. Both systems had more than enough raw horsepower power to run Linux, CrossOver Linux, and multiple Windows and Linux applications simultaneously.
CrossOver requires very little from a system. CodeWeavers claims that any 32-bit system that runs at 200MHz can run CrossOver. The program will run on 64-bit systems, but only if they have the 32-bit compatibility library installed. CrossOver also requires that your Linux includes Glibc 2.3.x or greater and X11R6 3.3 or greater. XFree86 4 with XRender and FreeType support is recommended. The bottom line is any modern Linux can run CrossOver.
The program can be installed in several different ways. The sure-fire way of installing it on any Linux is to use its shell script. Once you have it installed, CrossOver presents you with a GUI that works equally well with both KDE and GNOME. Here, you choose which Windows applications you want to install from a supplied list of supported applications.
Installing Windows applications is a snap. It's a pick and clip operation. You can also install non-supported applications. Some, such as my favorite HTML editor, NoteTab, even though not technically supported, will run, albeit with some problems.
You should also keep in mind that, while CodeWeavers is trying to support the most popular Windows applications on Linux, it doesn't support every program. Check the company's compatibility pages to see if anyone has tried to run your particular favorite program with CrossOver and how well it has gone for them.
Once in place, the supported Windows applications ran without a hitch. I spent most of my time working on Word 2003 documents, Excel 2003 spreadsheets, IE 6, and fairly complicated Quicken 2006 financial statements. The programs ran well. As a matter of fact they ran better on Linux than they did on Vista. Quicken, in particular, took better to CrossOver than it did to Vista. With a little research I found out that this was not just me. Vista is known to have trouble with several versions of Quicken.
Some Windows software runs better on Linux than it does on the latest version of Windows -- who knew?
CrossOver isn't perfect of course. While I was able to run Photoshop CS3, I sometimes had trouble rendering the CS3 interface. A screen refresh usually took care of the problem, but some users will doubtlessly find that annoying.
I would also sometimes need to force a screen refresh when one Windows application's window covered up another. When I'd reveal the "lower" application, the part of it that had been covered by the other Windows application wouldn't render properly. After doing anything with the new foreground application, such as running a command, the foreground program's screen reappeared as it should.
CodeWeavers also offers CrossOver Linux Professional, which costs $70, can be used for multiple users, and comes with CrossOver Games. This addition includes advanced support for DirectX, Microsoft's graphics application programming interfaces for games. With this, many Windows games will run well on Linux. I can personally attest that zapping your enemies and other baddies in World of Warcraft and Guild Wars is just as much fun on Linux as it on Windows. CrossOver Games is also available separately for $40.
Not sure if CrossOver is right for you? You can download a free 30-day trial version of CrossOver Linux and a seven-day trial edition of CrossOver Games. You should find that more than enough time to see if these programs deliver the Windows goods for you.
SOURCE: Linux
Install Windows XP on Your Pre-Installed Windows Vista Computer

The question I am asked most often is "How do I install a dual-boot with Windows XP on my new Windows Vista computer?" The answer is that it's not that difficult, it's just very time consuming, and you need to own a copy of Windows XP.
Note that you should not attempt this if you aren't ready to troubleshoot any problems that might occur.
The first issue we encounter is that computers with pre-installed operating systems take up the entire drive. Luckily Microsoft included the Shrink volume feature in Vista, so we can easily shrink the Vista partition down to make room for XP.
Open the Computer Management panel, which you can find under Administrative tools or by right-clicking the Computer item in the start menu and choosing Manage. Find the Disk Management item in the list and select that.

Now we'll shrink our volume down by right-clicking on the main hard drive and choosing Shrink Volume.

Now you can choose the size that you want to shrink, which really means you are choosing the size that you want your XP partition to be. Whatever you do, don't just use the default. I chose roughly 10gb by entering 10000 into the amount.

The next step might be confusing, because we need to change the cd-rom drive that's invariably taking up D: at the moment, because we want to use D: for the Windows XP partition, but it's already taken by the cd-rom drive. If you skip this step than XP will install onto the E: drive, which isn't the end of the world, but it's not quite as tidy.
Right-click on the cd-rom drive in the list and choose Change Drive Letter and Paths from the menu.

Now we'll change the CD drive to use E: by selecting that in the drop-down.

Now we can create a new partition for XP to live on and make sure that the drive letter is set the way we want. If you do not create a partition now the XP install will do so automatically, but it's easier and cleaner to do it this way.
Right-click on the Unallocated free space area and then select New Simple Volume from the menu.

Follow through the wizard and select whatever options you'd like, making sure to use D: as the drive letter.
Now you will need to close out of disk management and reboot your computer. This is because we can't do the next step until we reboot. (you can try, but it won't work)
So we've come back from rebooting… open up Computer from the start menu and then right-click on the D: drive and select properties. Give your partition a meaningful name like "XP". It would be wise to name the C: drive to "Vista" at this point as well.

Now you'll want to pop your XP cd into the drive and boot off it. You may have to configure your BIOS to enable booting off the CD drive, or if your computer says something like "Hit Esc for boot menu" you might want to use that.
Once you come to the screen where you can choose the partition to install on, then choose either the unpartitioned space or the new partition you created. Whatever you do, don't try and install onto your Vista partition! See how much cleaner it is now that we've labeled each partition distinctly?

We'll assume XP is completely installed at this point, and you will have lost your ability to boot into Windows Vista, so we'll need to use the VistaBootPro utility to restore the Vista boot loader.
Download and install VistaBootPro from vistabootpro.org
During the install you'll be forced to install the .NET 2.0 framework. Open up VistaBootPRO and then click on the System Bootloader tab. Check the "Windows Vista Bootloader" and then "All Drives" radio buttons, and then click on the Install Bootloader button.

At this point, the Windows Vista bootloader is installed and you'll only be able to boot into Vista, but we'll fix that. Instead of manually doing the work, we'll just click the Diagnostics menu item and then choose Run Diagnostics from the menu.

This will scan your computer and then automatically fill in the XP version.. click on the "Manage OS Entries" tab and then click in the textbox for Rename OS Entry, and name it something useful like "Windows XP" or "The Windows That Works"
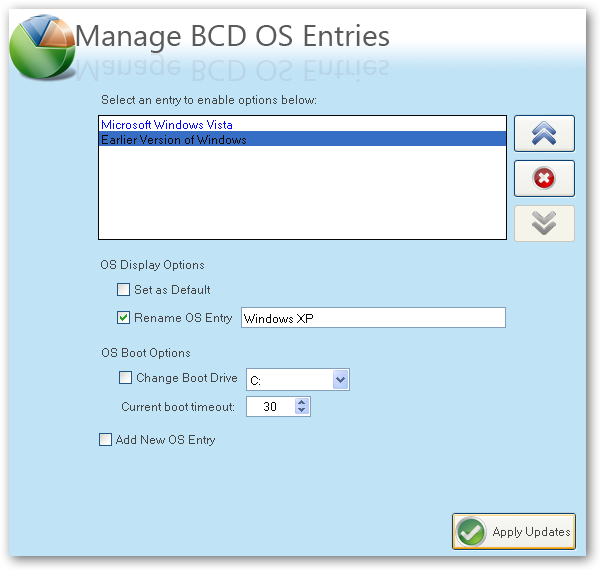
Click the Apply Updates button and then reboot your computer… you should see your shiny new boot manager with both operating systems in the list!

If you get an error saying "unable to find ntldr" when trying to boot XP, you'll need to do the following:
- Find the hidden files ntldr and ntdetect.com in the root of your Vista drive and copy them to the root of your XP drive.
- If you can't find the files there, you can find them in the \i386\ folder on your XP install cd
There's more information on this forum thread, thanks to nrv1013
This is a critical piece of information: Windows XP will be installed on the D: drive, even in Windows XP… so you'll need to keep that in mind when tweaking your system.

You can share information between the drives, but I wouldn't recommend messing with the other operating system's partition too much… it might get angry and bite you. Or screw up your files. What I do recommend is that you store most of your files on a third drive shared between the operating systems… you could call that partition "Data".
I'm going to write a number of followup articles dealing with all of the issues with dual-boot systems, so subscribe to the feed for updates.
SOURCE: HowToGeek
Read More......
Friday, August 8, 2008
Killer Development tool from Linux Foundation

Ask any independent software vendor what he hates most about developing for Linux and he'll tell you that it's having to develop for SUSE and for Red Hat and for Ubuntu and ... you get the idea. The Linux Foundation has just released a beta of a new program, Linux Application Checker (AppChecker), that's going to make ISVs and other programmers start to love developing for Linux.
AppChecker, now in beta 3, is a downloadable open source Linux program. Once installed, the program shows you a Web page, the LSB Database Navigator. Here, you click on the Application Check link. This presents you with a Web form interface to fill out. In this form, you'll enter a name for your report and Name field, and in the Components field you'll enter the file path for your application. Next, enter the application's individual files, directories, installed RPM packages (prepended with pkg:),; RPM and .deb package files, and tar.gz and tar.bz2 archives. To make this manageable, click on the Select Application Components button so you can enter each item in a separate field. Next, select the LSB Version and LSB Profile you want to test against.You then let AppChecker rip. It will automatically decompress archives and start testing. The program will check out your ELF (Executable and Linking Format, a.k.a. binary files), Perl, Python, and shell scripts. So far, this doesn't sound much more than just another fancied-up version of the forerunner of all program checkers, lint, but it's what AppChecker does next that will make it a must for any Linux software developer.
AppChecker then checks your program not only against different versions of the Linux Standard Base (LSB), but also against all the Linux distributions in the LSB Database. After the test is done it will present you with a report. It's this report that makes AppChecker special.
In the Web-based report, you're shown the compatibility status of your application with the various distributions, and which external libraries and interfaces your program uses. If all goes well, it gives you the option of putting your program in for LSB certification straight from the test program. It doesn't just give you a thumbs-up or thumbs-down for your application on any particular distribution, according to Amanda McPherson, Linux Foundation vice president of marketing and developer programs -- it "gives you the details you need to get your program running on a particular distribution."
McPherson warns, "This is a beta program and there's no guarantee, but yes, if AppChecker says your program should work with, say, Ubuntu 7.10 and 8.04, then your application should work on these distributions. The results can get very granular. It will tell you this library or this interface isn't available in this distribution. It can also recommend some replacements. For example, OpenSSL is often a problem and you should use different SSL library."
The program's initial idea came from McPherson and Ted T'so, the Linux Foundation's CTO and noted Linux kernel developer. AppChecker was then put together by T'so and the Russian Academy of Science. The program is licensed under the GPLv2.
According to AppChecker's technical documentation, AppChecker works by analyzing your "program's C/C++ symbols -- mostly functions with some global variables -- and libraries required by an application that are satisfied by dynamically linked libraries provided by a distribution."
AppChecker isn't a debugger. It doesn't check that the "type information expected by the application matches the type of the object provided by the distribution's libraries. For example, the layout of a data structure might have changed, or the function parameter that had previously been a 32-bit integer may have been changed to a 64-bit integer. Another problem that cannot be detected by the AppChecker is if the details of a function's behavior changes from one version to another."
What it does do is spell out for you what libraries and interfaces are provided by any given distribution, and make suggestions on which ones you might use as replacements to work on a particular version of Linux, or that will work on several different Linux distributions, McPherson explains. With this tool, you can quickly see what you need to do with your application to make it more portable across different Linux distributions.
It isn't perfect, of course. Not only is the program still in beta, but some libraries and interfaces aren't in the LSB databases. Still, it's a huge step forward in enabling developers to see exactly what they're dealing with in writing an application for multiple different versions of Linux.
AppChecker users can keep their test results to themselves, but McPherson hopes that they'll share their results with the Linux Foundation. "If you choose choose to share your results with us, it helps the Linux platform and helps the LSB get better. For example, it tells us what libraries Linux developers are using that aren't in LSB. We can then include [them] in the LSB, and that will make the LSB better."
SOURCE: LINUX
Author: Steven J. Vaughan-Nichols
Friday, August 1, 2008
NOKIA N96 Complete Info


Description
The one to watch.5 mega-pixel camera, digitial TV, DVD video capture and 16GB memory, for a true multimedia experience.
| Nokia N96 - Key Features: |
| Network | Quad Band GSM 850/900/1800/1900 |
| 3G | Yes (900/2100 HSDPA) |
| Memory | 16GB |
| Memory Slot | microSDHC |
| Wi-Fi | Yes (IEEE.802.11b/g) |
| Bluetooth | Yes (stereo) |
| Camera | Yes (5 mega-pixel) |
| Size | 103 x 55 x 18 mm |
| Weight | 125g |
| Battery (BL-5F) | Talk Time: 220 mins; Standby Time: 220 hrs |
Camera:
Explore and capture the world around you. Built in GPS works in conjunction with the 5 mega-pixel camera to automatically geotag your photographs. Store not only the date/time but the location for each photograph automatically and seamlessly. Auto-focus, Carl Zeiss optics and a high intensity dual LED flash combine to create photographs with exceptional clarity.
Video Player:
Immerse yourself in entertainment. The brilliant 2.8" high resolution display lets you view your videos and photographs in stunning detail. 16GB of on board storage allows you to take your collection of high-definition movies with you.
Video Record:
>Experience DVD quality video capture. Record video at high resolution VGA (640 x 480 pixels) and at a smooth 30 frames per second. Digital video stabilization ensures smooth steady video capture reducing unwanted shake whilst the video photo light allows night time recording. Built in TV out option allows you to connect your Nokia N96 directly to a TV for watching your movies on the big screen.
TV:
Watch TV without a TV. DVB-H support brings digital TV directly to your Nokia N96. Where available, DVB-H brings your favourite TV's shows and channels to watch on the go.
Music Player:
Take your music with you. Built in 16GB of storage and expandable memory lets you carry over 6000 songs in your pocket. Hear a song you like? Download and buy songs instantly on your Nokia N96. Stereo FM radio lets you listen to your favourite music stations and talk shows.
Navigation:
Find new places around you. Assisted GPS (AGPS) technology and Nokia Maps provides free downloadable maps and satellite imagery for over 150 countries around the world. Find your way whether your driving or walking on foot. Location based services lets you find cash machines, shops, restaurants, bars and useful locations near you automatically when you need them.
Internet: Carry the internet in your hand. Nokia Web Browser with Mini Map technology displays complete websites. Support for HTML, Java script & Flash bring a rich multimedia internet directly onto your phone.
Technical Details
| • | Dimensions: - 103 x 55 x 18 mm - Weight: 125g |
| • | Display: 240 x 320 pixels (2.8 inch) |
| • | Network: - GSM: 850/900/1800/1900 (Quad-Band) - WCMDA: 900/2100 (Dual-Band) |
| • | Camera: - 5 mega-pixels - Digital Zoom - Dual LED Flash |
| • | Music: - Supported formats: MP3, AAC, eAAC+ & WMA. - FM Stereo Radio (RDS) - Nokia Internet Radio - Nokia Music Store |
| • | Video: - Hi-Resolution VGA Video Recording - 30fps Video Recording - Supported formats: MP4, 3GPP, H.264 & Real Player - Video Streaming |
| • | Ringtones: - Monophonic - Polyphonic (64) - MP3 - AAC |
| • | Messaging: - SMS - MMS (with video) - E-mail (POP3, SMTP, IMAP4) |
| • | Memory: - Phone Book (Unlimited) - Dialed Calls (30 Days) - Missed Calls (30 Days) - Received Calls (30 Days) - 16GB (internal) - microSDHC (external) |
| • | Call Features: - Hands Free - Caller ID - Voice Dialing - Push to Talk (PTT) |
| • | Connectivity: - microUSB - Nokia 3.5mm AV connector - Bluetooth (2.0) - Wi-Fi (IEEE 802.11g) - GPRS Class 32 - HSDPA (3.6 Mbits) |
| • | Navigation: - AGPS - Nokia Maps |
| • | Features: - DVB-H Digital TV Receiver - TV Out - Office Document Viewer (Word, Excel) - PDF Document Viewer |
Read More......
Subscribe to:
Posts (Atom)